Tuesday, November 30, 2010

Happy Birthday Banner

Here is a project I just completed for the Glue Dots (R) Design Team.  It's a very versatile banner that can be used for boys, girls, and even adults.  I made it for my son's birthday and plan to use it for my daughter's in January.  You can change the colors if you want to make it more masculine or feminine, or even use baby shapes for a baby's birthday.  Have fun!


            Materials
·        Cardstock:  black, red, blue, yellow, green, light green, purple, patterned
·        Craft Glue Dots ®  
·        Cricut machine and cartridges  (I used Sure Cuts a Lot software to cut the letters and  the George and Basic Shapes cartridge to cut the scalloped circles and triangles.  You can find similar images on other cartridges.) – Provo Craft
·        Sizzix machine and dies (candle, balloon)
·        Souffle pens – Sakura
·        Glitter gel pens – Sakura
·        Gold brads

            Directions  (Refer to photos for placement of all pieces.)

1.      Using Cricut machine and cartridges of choice, cut the following:
·        14 scalloped triangles at 4” from red, blue, yellow, and green
·        14 circles at 3 ½” from black cardstock.
·        the letters “H-A-P-P-Y-B-R-T-H-D-A-Y” AT 3” from purple cardstock.
2.  Using Sizzix machine and dies, cut 4 candles and 2 balloons from yellow, light green, and patterned papers.  Add details with glitter gel pens.    
2.      Using Souffle pens, add dots and dashes around the edges of the circles and triangles.
3.      Adhere circles to triangles, following pattern in photo.
4.      Stamp owl onto white cardstock using permanent black ink. 
5.      Using the photo as a guide, adhere letters and shapes to black circles using Glue Dots ®.
6.      Punch holes in top corners of triangles, and attach with brads.


Wednesday, November 24, 2010

How to Make Snowman Earrings

Happy Thanksgiving!  To kick off the holiday season, I've made a video showing how to make these adorable snowman earrings.  You can make them in about 5 minutes, or you can buy a pair at my Etsy store:  http://www.etsy.com/shop/scrapjanny.  Have a wonderful Thanksgiving; and, if you make these earrings, please email me with photos.  I'd love to share them here.  Thanks for stopping by, and remember to be your crafty self.

Tuesday, November 23, 2010

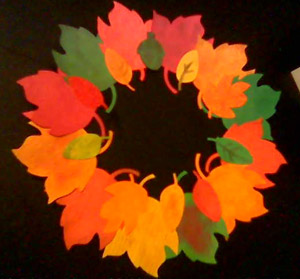
Fall Wreath

Red, orange, yellow, green . . . .  No, I’m not reciting the color spectrum that you learned in school.  These are the rich, brilliant colors of fall that make it the most spectacular of all the seasons.  It’s truly a feast for the eyes, and it’s quite simple to bring some of that splendor into your own fall home decor in the form of a paper-leaf wreath.
 
  Here are the supplies you will need for this project:
The first thing you need to do is die cut or punch a variety of leaves.  For my wreath, I cut leaves with my Big Kick Big Shot and Cricut, and supplemented these with some smaller leaves punched with a leaf punch.  You can also cut acorns, walnuts, or any other shapes that represent autumn.

After you’ve cut all your shapes, add some details by scoring veins into your leaves with an embossing stylus and foam pad.  I used a real leaf as a model.

Apply chalk or ink to the embossed areas to add dimension and make them stand out.

Using a die-cut machine, a circle cutter or a plate, cut a doughnut shape to create the wreath base.  Adhere the leaves and other shapes to the wreath, layering as you fill up the wreath.

This is a great project to do with the kids.  Don’t limit yourself to only fall scrapbook paper and cardstock.  You can use any paper that will work with your tools and machines, including your children’s construction paper.  Happy fall, y’all!

Thursday, November 18, 2010

Holiday Quick Tip #2: Use Digital Stamps

Hi everyone!  Thanks for checking out my second Holiday Quick Tip.  There are so many free digital images on the Internet, why not grab some to use for your holiday cards this year?  And you know I can't resist Snoopy!  Happy Holidays, and check back soon for the next tip!

Thursday, November 11, 2010

De-Coloring Your Photos


I have a new article up on Scrapjazz.  It's all about how to convert your color photos to black-and-white, using Photoshop Elements.  Check it out here:  De-Coloring Your Photos.

Happy scrapping!

Tuesday, November 9, 2010

Birthday Card

This is a card that I made for a Gina K. Sketch Challenge. I cut the ovals using my Coluzzle and outlined the mailbox and the inner oval with a Stardust Gelly Roll pen by Sakura.  Happy Stamping!

Stamps: Gina K. Spring Mix
Paper: White Ultrasmooth (TAC), aqua blue, Rust textured (The Paper Company)
Ink: Palette Noir Black
Accessories: Lime Green and Ruby Stickles, Fiskars border punch, E.K. Success corner rounder (large purple)
Techniques: Colored pencils and Odorless Mineral Spirits

Friday, November 5, 2010

Holiday Quick Tip #1: Make Tags From Scraps


Sorry for the poor quality of the video.  This was done SUPER quickly, and it's straight from my Blackberry.  Check back soon for another Holiday Quick Tip.  Thanks for stopping by!

Thursday, November 4, 2010

Monday, November 1, 2010

Halloween Projects

Hi there!  I've been so busy making Halloween projects that I seem to have neglected my blog lately.  Sorry about that!  Here are some of the reasons I've been so busy.  The toppers would make great embellishments for those Halloween pages.  Have fun, and I hope everyone had a Happy Halloween!
 
Skittles Treats

 
Peppermint Patty Treats