Showing posts with label Christmas. Show all posts

Thursday, December 19, 2019

Holiday Card Throwback (not really!) #11: Winter Birthday Cards

Hi there!  Today's throwback isn't really a throwback, in the sense that it isn't a video walk down Memory Lane.  Today I decided to make some birthday cards for a birthday RAK (Random Acts of Kindness) group that I belong to.  Since I wanted to get a head start on my January cards, and since I still had my box of Christmas stamps out, I thought I would use a snowflake background stamp. Almost all the supplies I used were quite old.   A full supply list, with links to where you can buy them, will be at the end of this post.  If you'd like to know how I made these, please leave a comment below to let me know.  Thanks for visiting, and Happy Holidays!


Supplies (Amazon Affiliate Links - I received no compensation from any of the companies who make these products, and using the links provides me with a very small amount of money at no extra cost to you.  Thanks!) 

Hero Arts Snowflake Background Stamp (I used one by Impression Obsession, but this one is very similar.)
Heavy grey cardstock (Michael's)
W Plus 9 Basic Banners stamps and die set
Snowflake sequins (Michael's)


Saturday, December 14, 2019

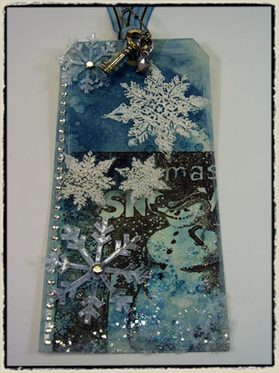
Holiday Card Throwback #10: Tim Holtz Christmas Tag - Good Ol' Frosty

Remember when Tim Holtz used to do his 12 Tags of Christmas?  It was such an exciting time for us stampers.  We got a chance to play with all those supplies we'd collected during the year and do something fun with them.  It was so disappointing when he stopped doing them in 2016.  I really miss them.

Yesterday I thought I'd re-visit some of them and share with you.  I thought it would be very timely, since things are getting down to the wire, and you're probably (like me) getting ready to wrap some Christmas gifts.

Here ya go:  Enjoy!

2007: Day 2

Tag2

Saturday, November 9, 2019

Holiday Card Throwback #2

Hi there!  Did someone say "Coluzzle"?  Check this out!  Here is another "Oldie But Goodie" from Kristina Werner's 2009 Holiday Card Series to inspire you.  Enjoy, and thanks for stopping by!


Friday, November 8, 2019

Holiday Card Throwback Series

Hey everyone!  Today is the first day of my Holiday Card Throwback Series, where I will post "blast from the past" videos showing how to make holiday cards.  Have you got supplies that you've bought over the years because someone did something cool with them?  Have they been sitting around doing nothing ever since?  Maybe you'll see them used in one of these videos!

Please note that these are not my videos, and I'm not endorsing any of the original posters or the companies mentioned in the videos.  I haven't received any compensation from anyone.  I'm sharing these for fun and inspiration.  I hope you enjoy them as much as I do!

************************************************************************

Today's video inspiration comes from Kristina Werner's 2009 Holiday Card Series.  She uses her Cricut Expression with SCAL, the Fiskars Threading Water punch, the WRMK Corner Chomper, and an old SU snowflake punch!  (Maybe we have some of these?)   Enjoy!


Sunday, November 23, 2014

Potholder Organizer

Today I have a guest blogger whom I've asked to share a project she made earlier this week.  It's my daughter Haley (14), and she made this adorable potholder organizer in Girl Scouts this week. Take it away, Haley!

Hey everyone!

So, holidays.  Stressful time, am I right?  The time of year everything's on sale and you end up arguing with a middle age mom over the last monster high doll on the shelf.  Wouldn't it be so much easier to get presents anyone can enjoy, without sticking to the usual gift cards and socks?

Well, that's where this little beauty comes in.


That, my friends, is a portable organizer made from a potholder, six plastic baggies, a button, and a (Totally optional) piece of ribbon.

This makes a great present in sooooo many ways.

1.  Super affordable.  Just one trip to the local dollar store gives you everything you need.

2.  Simple to make.  If you can sew and/or use a hot glue gun, you can make this no problem.

3.  You can customize it to suit everyone on your list.  Use a potholder in someone's favorite color, decorated with flowers for a pick-me-up, or even drawn on by hand with some sharpies.

4.  Useful for anyone.  Your teenage daughter can use it for makeup and hair ties, the family workaholic can store metrocards and cash, your well meaning but kinda nutty aunt can use it for coupons and little candies, etc.

So now that I'm done gushing about how great a gift this is, let's dive into the materials and steps.

MATERIALS

1 Potholder (Super easy to find at the dollar store, ranging in colors and patterns from solids to snowflakes)

1 button (Again, super easy to find.  If, on the off chance, you can't buy one, just take the spare that every button up garment comes with.  Shhhhh, nobody will notice...)

Needle and thread and/or a hot glue gun (I recommend sewing the button and hot gluing the baggies and ribbon, but if you only have one or the other you can make it work.)

6 snack baggies (  If you don't have a box of these in your house, reconsider your life choices and buy a box.  Maybe two.  Definitely two.  Yes, you do need that many.  Trust me.)

Ribbon (Optional, mainly just used to pretty up the finished project.  If you don't have any, no biggie.)

INSTRUCTIONS

1.  Take your potholder and fold it in half, design (If any) facing out.  See where the loop is resting on the potholder (For me it was Santa's boot)?  Mark that with chalk or something.

2.  Sew or glue your button to the marked spot.  Don't worry about being super exact, but make sure the loop can fit over the button securely.  Congrats, you've made the closure!

3.  After reveling in your victory, flip the potholder over.  This is where the baggies will go.

4.  Sew or glue the bottoms of the baggies together in two groups of three.  Tip:  Use a low setting for the hot glue gun.  Not only will it reduce any plastic melting, but you'll spare your fingers a mighty deal of pain in case of any mishaps.

5.  Now to glue or sew them into the potholder.  Take your groups and put one on either end of the potholder, openings facing out.  You can glue them with a little space in the middle or completely together.  If sewing, sew only through the first layer of the potholder.

6.  If you'd like, sew or hot glue a piece of ribbon between the baggie clusters.

7.  Pat yourself on the back for your hard work and reward yourself with a bowl of popcorn and a netflix marathon.

There you go!  A great gift for everyone on your list!  And a homemade one to boot!  

Happy holidays, everyone!  :)

Thank you so much, Haley!  I'm sure you have inspired us all to make some of these adorable - and affordable - organizers for holiday gifts this year.

Saturday, June 22, 2013

Project Life: Incorporating the Holidays

Hi everyone!  Do you do Project Life?  Do you wonder how to include the holidays in your layouts?  I have some ideas for you in my latest article for Scrapjazz.

*********************************************************************************

One of the things I like the most about Project Life is that it frees me to document the common, everyday happenings in our lives.  Since I started Project Life, I've been able to capture moments like my son helping his sister with her homework, my children playing a video game without arguing, and seeing a package of cookies that took me back 40 years to when I was a little girl in my grandmother's store.  These are the things that I want to remember, and that I want my family to remember as well.  But what about the big events, such as birthdaysweddings, and holidays?

Like many other scrapbookers who are doing Project Life, I still scrapbook single events and holidays in separate albums; however, I do want to include some photos in my monthly Project Life layouts as well.  That can present a challenge for some of us, and here is how I've decided to handle this challenge.


The first thing I did was decide which pictures I would include.  Since I had already made the Christmas layout in our holiday album, I wanted to use some of the ones that I didn't use for that layout.  Then I chose some of the everyday photos that I had taken during December.  After trimming them down to (or printing them in) the sizes that I wanted to use in my layout, I moved on to selecting my papers. 
I decided on the Season's Greetings collection by Echo Park, and I added cardstock in matching colors.  Although the turquoise cardstock isn't in the patterned papers, I thought that adding a pop of blue would add a wintry touch to the layout without it being overwhelmingly "Christmas."  I love the contrast that it adds.

For my title, I used white cardstock and stamped "December" in a matching blue ink.  I used the same white cardstock, plus a scrap of vellum, for my journaling.  I added some of the stickers from the Season's Greetings collection, a few flowers from my stash, and a couple of strips of washi tape.

So there you have it:  my solution to the challenge of how to include the holidays in your Project Life layouts.  Combining both seasonal and non-seasonal supplies makes it easy to mix holiday and everyday photos smoothly, so that they complement each other and result in a balanced spread that is fun to look at.

Wednesday, March 20, 2013

Sisters

I'm still working on my December Project Life layout.  I had to make it 4 pages, since I have so many photos.  And those are the pictures that I didn't include on my Christmas layout!  I didn't think I had taken that many pictures, but I guess I did.


Here's a picture that's going on its own layout.  My sister gave me this last month when we visited her.  I'm planning a layout with some of the pictures of the two of us together.  Several years ago, she underwent chemo for ovarian cancer, shortly followed by thyroid cancer.  She is cancer-free (4 years now), and she is an inspiration to me.  I'm planning to write about our relationship when we were younger and how that relationship has become stronger as we've gotten older.  (She's 9 years older than I am.)

I'll post pics of the December PL layout when I finish it, and I'm going to do that by the end of this week.  Thanks for stopping by.  :)


Thursday, December 20, 2012

Letters to Santa


Hi everyone!  I hope you are holding up during the holiday rush.  I'm barely hanging on.  I thought you'd enjoy this article that I wrote that was just published on Scrapjazz.  It's all about what to do with those letters to Santa.  Merry Christmas!


Letters to Santa

by Jeanette Giancaspro (Dec 19, 2012)
My children don't write letters to Santa anymore.  Sad but true.  They are 18 and 13, so they haven't written to him for a while now.  I know they have to grow up, but like most other parents of teenagers, I wonder how the years could have passed so quickly.  And, of course, how they could have gotten so big, while I haven't aged at all!
One of the reasons that I scrapbook is to remember my children's younger years.  I don't want to forget all of those adorableHalloween costumes, the dozens of Easter eggs they've decorated, the birthdays we've celebrated together, and their childhood Christmases - especially their letters to Santa.
While looking through our scrapbooks recently, I came across this layout from 2004.  Although the papers have long since been discontinued (they were from BasicGrey), I noticed that the layout I made was one that could be easily re-created with newerpatterned papers and basic cardstock.
Although you can't see it in the photo above, the journaling for this layout is hidden behind the title panel.  It is attached to the page with hinges that open to reveal the story of Christmas 2004.  Here is a closer look at the opened panel.
Making this is a lot easier than it looks.  You don't even need to use hinges.  Simply fold a piece of cardstock so that it is the size that you want, and adhere the back piece to your page.  Place a cutting mat inside the page protector, and cut a slit around each of the sides that open.  This will create a flap in the page protector, so that the hidden journaling can be read when the panel is opened.  I clipped the page protector to the front of the panel with a shaped paper clip.  If you prefer to keep your journaling hidden, then you can eliminate this step and leave the page protector intact. 
The right page of my layout is where I housed the letters to Santa that my children wrote in 2004.   To make a pocket like this one, cut a piece of heavyweight patterned paper or cardstock to approximately 3" x 12".  You can adjust the height measurement as needed.  Apply a strong adhesive to the two side edges and bottom edge of your paper, and adhere it to the page.  It is important that you use heavyweight paper or cardstock and strong adhesive, because your pocket will probably get a lot of wear.  Although I used the original letters in my layout, if you're concerned with their safety, you can use copies.  I didn't cut a slit in my page protector, because I didn't want them to fall out of the pocket, but you certainly can if you wish.
I've also used these techniques on layouts for other occasions.  I've included Thanksgiving place cards, birthday cards, and other special memorabilia in pockets on those pages.  Sometimes I cut slits in the page protectors for easy access to the pockets' contents, and sometimes I don't.  It depends on the layout.  I've included hidden journaling in some of my children's baby layouts, because it is very private and intended for their eyes only (when they are older).
Whether you use these techniques to include letters to Santa, or you use them on other layouts for your special occasions and holidays, I hope you find these ideas useful and easy to replicate.  They are a fun way to add some interactive elements to your pages.  Happy Holidays, everyone!
Other supplies used on these pages include:

Tuesday, December 11, 2012

Gift Card Holder

This is a wonderful video tutorial from Lawn Fawn.  It's adorable, and I'm planning to make some for Christmas gift cards that I'm giving this year.  Enjoy!

Gift Card Holder

Monday, December 10, 2012

Wednesday, November 30, 2011

Christmas Cookies

Making Christmas cookies with the kids. Mmmm ... I love the smells and tastes of Christmas!  And I love doing things with my children, especially at this time of year.  I'm so lucky that they still enjoy baking cookies with me.  (Most of the time, anyway.  :) )

Thursday, January 13, 2011

Holiday Card Collage


OK.  It's time to take those holiday cards down.  Yes, if you're like me, you haven't quite gotten around to that yet.  But what are you going to do with all of them?  Make a card collage to add to your holiday decorations next year (and the years that follow too).  It's not hard at all.

Over the past few years, our family has grown significantly. My nieces and nephew have all married, and two of them now have children of their own. That means lots of pictures, especially around the holidays. The Christmas cards I enjoy receiving the most are the photo cards. They not only showcase my adorable great-niece and great-nephews, but they also lend themselves to many holiday crafts.  This year, I decided to create a collage with the photo cards that I have received for the past three Christmases. It will hang on our living room wall this holiday season.  Putting together a collage like this isn’t difficult. Just follow these simple steps:

Supplies:

12” x 12” sheet of green cardstock

8 ½” x 11” sheet of white cardstock

Creative Imaginations Christmas/Holidays paper [double-sided]

14” of coordinating ribbon

Jolee’s Boutique Christmas/Holidays dimensional stickers

scalloped-edge punch


Instructions:

Use the green cardstock as your base.

Cut one sheet of double-sided paper to 6” x 12” and 2” x 12”.

Use the scalloped-edge punch to create a border on one long edge of each cut piece.

Alternating sides of double-sided paper, attach the 6” x 12” piece to the left side of the green cardstock and the 2” x 12” inch piece to the right side, being sure to line up the edges.

Trim photos and attach to the white cardstock, overlapping and layering as you go.

Attach the white cardstock about 2 inches down from the top of the page.

Attach ribbon over the top seam and secure on the back.

Cut your title from a photo card, and add to the layout.

Finish with Jolee’s embellishments.

Frame and hang on the wall.

What a wonderful way to enjoy those cards year after year and see how the children grow! Now it’s your turn.   I'd love to see what you create. Post a comment, and I'll send you my email address so that you can email a photo of your photo collage to me by January 31. I'll enter your name into a random drawing for a little prize from me.  Have fun!

Monday, December 13, 2010

Holiday Quick Tip #3: Tiny Tags

Hi guys!  Hope your holiday season is going smoothly and you aren't too frantic.  I'm doing OK, and I'm a little ahead of schedule actually.  So I had a few minutes to record one more Holiday Quick Tip video.  I'm going to show you how to make the most adorable little tags from scraps of plain white cardstock.  Please leave a comment if you like the video.  Enjoy, and thanks for stopping by!

Friday, December 3, 2010

Holiday Explosion Box


Create this quick, easy Holiday Explosion Box using your favorite holiday cardstock and Glue Dots ®.

Materials:
7 ½” x 7 ½” piece of heavy cardstock for box base
3 7/8” x 3 7/8” piece of coordinating heavy cardstock for lid
Scoring board
Paper trimmer
Bone folder
Embellishments (optional)


Directions:
For the Base:
  1. Score the 7 ½” x 7 ½” piece of cardstock  2 ½” in from all 4 sides.
  2. Score a diagonal line from each outside corner to the matching corner of the interior square (see photo).

  1. Cut off the corners on the diagonals.
  2. Fold along score lines to form box.  Crease with bone folder.  Do not adhere the box together; the lid will hold it closed.


For the Lid:
  1. Score the 3 7/8” x 3 7/8” piece of cardstock  5/8” in from all 4 sides.
  2. Cut along one scored line per side, as shown in photo.

  1. Fold along score lines to form lid.  Crease with bone folder.
  2. Using Craft Glue Dots®, adhere tabs.  Be sure to apply the dots on the top side of each tab.

  1. Embellish as desired.


Wednesday, November 24, 2010

How to Make Snowman Earrings

Happy Thanksgiving!  To kick off the holiday season, I've made a video showing how to make these adorable snowman earrings.  You can make them in about 5 minutes, or you can buy a pair at my Etsy store:  http://www.etsy.com/shop/scrapjanny.  Have a wonderful Thanksgiving; and, if you make these earrings, please email me with photos.  I'd love to share them here.  Thanks for stopping by, and remember to be your crafty self.